Supabase
An open source Firebase alternative. We're building the features of Firebase using enterprise-grade open source tools.
Services
imgproxy
darthsim/imgproxy:v3.8.0postgresql
supabase/postgres:15.8.1.085storage
supabase/storage-api:v1.28.2kong
kong:2.8.1realtime-dev
supabase/realtime:v2.57.2supavisor
supabase/supavisor:2.7.3functions
supabase/edge-runtime:v1.69.15Deploying Supabase
Supabase is a popular open-source alternative to Firebase. It provides a suite of tools including a Postgres database, authentication, APIs, and file storage, making it a robust backend solution.
Zeabur simplifies the deployment of this complex stack. With Zeabur, you can launch a fully functional Supabase instance (including Kong Gateway, Authentication, and PostgreSQL) in one click without manual configuration.
What you will learn
In this tutorial, we will guide you through:
- Deploying a Supabase service stack from the Zeabur Marketplace.
- Accessing the Supabase Dashboard via the Kong Gateway.
- retrieving your API keys and connecting your application.
⚠️ Important Limitations:
No Logs in UI: The "Logs" feature in Supabase Studio will not work (due to missing Vector service). You must check logs via the Zeabur dashboard for each service. No MCP: The AI Model Context Protocol server is not included in this template.
Phase 1: Deploying the Service
Step 1: Create the Supabase Service
Zeabur offers a "one-click deployment" via its template marketplace.
Option 1: Create Supabase instance from Project page
- Log in to your Zeabur Dashboard.
- Click the "Add Service" button.
- Select "Template" (Marketplace).
- Search for
Supabase. - Select the Supabase template. Your services (including PostgreSQL, minio, and Kong) will start deploying immediately.
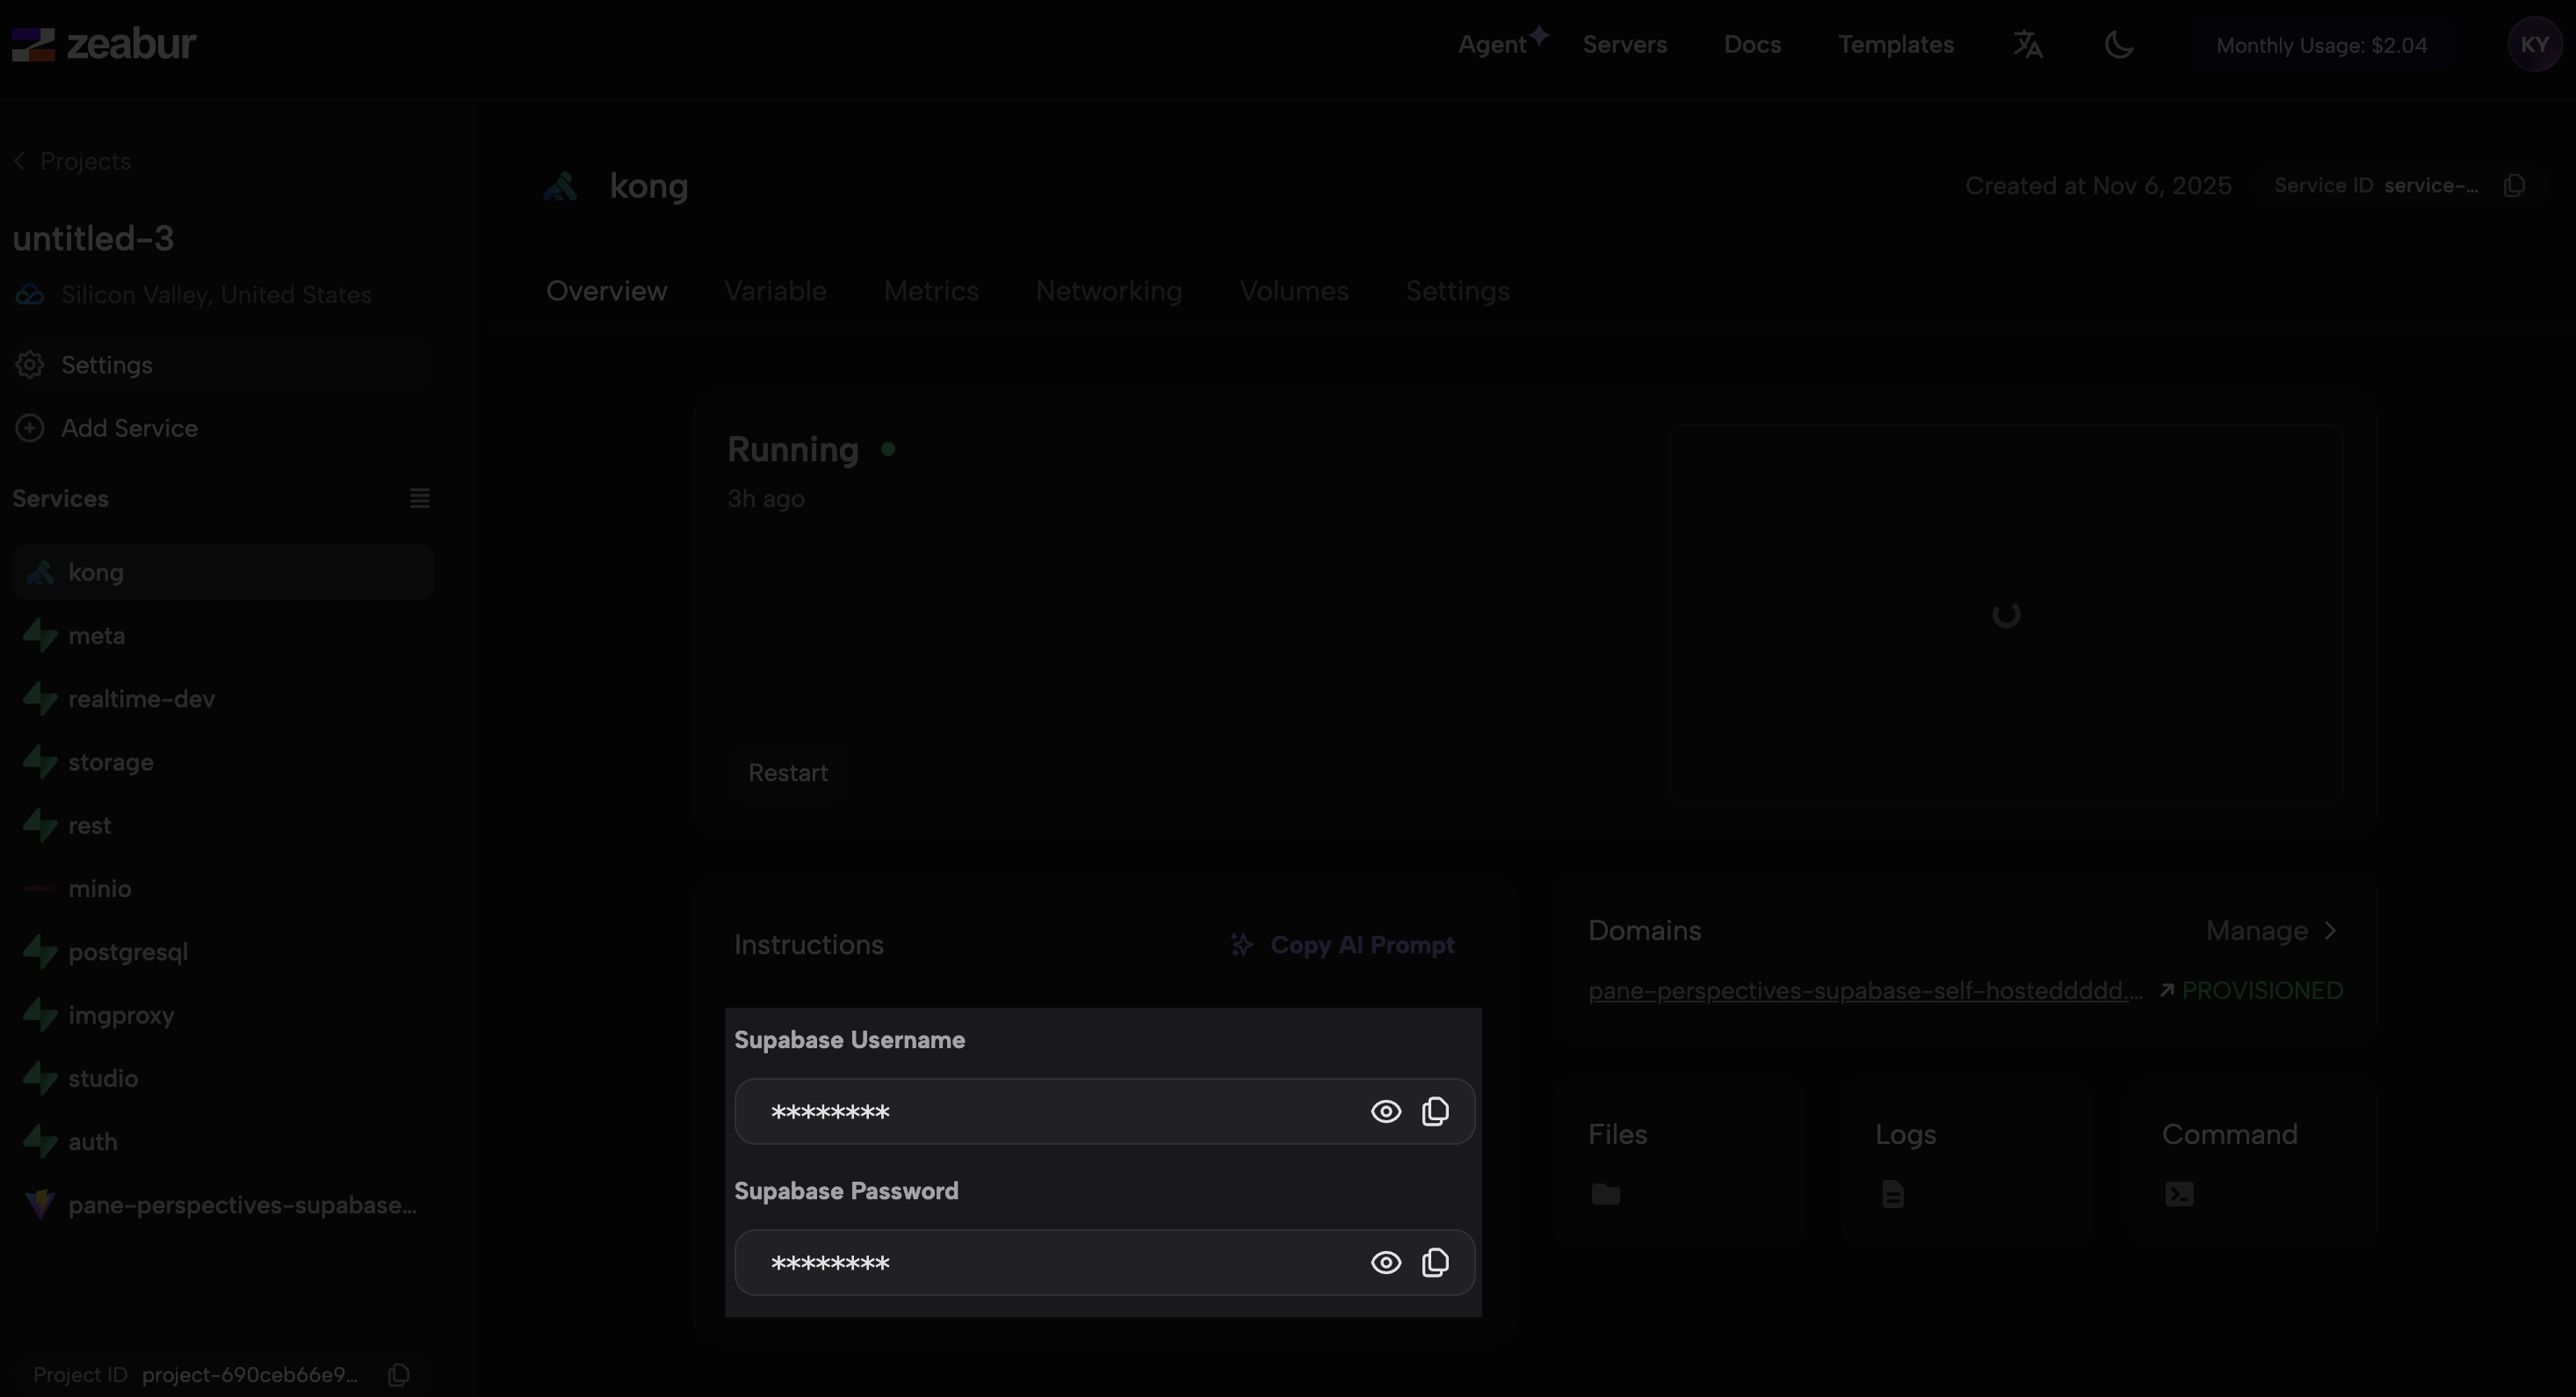
Step 2: Access the Supabase Dashboard (Kong Gateway)
Unlike a standalone database, Supabase on Zeabur uses a Kong Gateway to manage access. You need to retrieve credentials to log in to the UI.
- Navigate to the Kong service panel within your project.
- You will find the Supabase Username and Supabase Password displayed here.
- Go to the Domains section on the side of the Kong service panel and click the provided URL.
- Use the credentials from step 2 to log in to the Supabase Dashboard.
Phase 2: Securing Your Instance (CRITICAL)
⚠️ WARNING: The template deploys with default API keys for demo purposes. You MUST generate new keys before production use, or anyone with knowledge of the default keys can access your database.
Step 1: Generate New Keys
- Visit the Supabase JWT Generator.
- Create a custom
JWT_SECRETand use the tool to generate:- An
anonkey. - A
service_rolekey.
- An
Step 2: Update Kong Environment Variables
- Return to the Kong service in Zeabur.
- Go to the Variables tab.
- Update the following values with your new keys:
JWT_SECRET: Your custom secret.ANON_KEY: Your newanonkey.SERVICE_ROLE_KEY: Your newservice_rolekey.
Step 3: Restart Services
To apply these security changes, you must restart the stack:
- Go to your Project Settings → General.
- Scroll to Batch Actions.
- Click Restart All.
Phase 3: Configuration (Auth & Email)
By default, Supabase cannot send emails (magic links, password resets). You need to configure an SMTP provider. We recommend Resend, but any SMTP provider works.
Step 1: Configure SMTP (Email)
- Navigate to the Auth service in your Zeabur project.
- Go to the Variables tab and add the following:
GOTRUE_SMTP_HOST:smtp.resend.com(or your provider)GOTRUE_SMTP_PORT:587GOTRUE_SMTP_USER:resend(or your username)GOTRUE_SMTP_PASS:re_123...(Your API Key)GOTRUE_SMTP_ADMIN_EMAIL:noreply@yourdomain.comGOTRUE_SITE_URL:https://your-project-domain.zeabur.app(The link where users are redirected)
- Restart the Auth service to apply changes.
Step 2: Configure OAuth (Google/Apple) - Optional
To enable Google Login, add these variables to the Auth service:
GOTRUE_EXTERNAL_GOOGLE_ENABLED:trueGOTRUE_EXTERNAL_GOOGLE_CLIENT_ID:your-google-client-idGOTRUE_EXTERNAL_GOOGLE_SECRET:your-google-secretGOTRUE_EXTERNAL_GOOGLE_REDIRECT_URI:https://your-project.zeabur.app/auth/v1/callback
Note: Ensure you update your-project.zeabur.app to your actual domain.
Step 3: Test Email Functionality (Manual)
Once the service restarts, verify the configuration by manually triggering a signup via terminal:
curl -X POST "https://your-project.zeabur.app/auth/v1/signup" \
  -H "Content-Type: application/json" \
  -H "apikey: YOUR_ANON_KEY" \
  -d '{
    "email": "test@example.com",
    "password": "yourpassword"
  }'
Expected Results:
- You receive a
200 OKJSON response. - A verification email arrives in the inbox of
test@example.com(check spam).
Troubleshooting Email
- Redirect URI Mismatch: Ensure
GOTRUE_SITE_URLmatches your actual deployed domain exactly. - SPF/DKIM: If using a custom domain, ensure your DNS records match your SMTP provider's requirements to prevent rejection.
- Delivery: Initial emails often go to spam; "warm up" your domain or mark as "not spam".
Phase 4: Connecting with Supabase
Prerequisite: Get Your API Keys
Crucial: Do not copy keys from the Supabase Studio dashboard, as it may display old default keys.
- Go to the Kong Service in Zeabur → Variables.
- Copy your ANON_KEY and your domain URL.
Option 1: Connect your Frontend/App
Best for: Connecting your Lovable project or standard web application.
To enable communication between your frontend application and your Supabase backend, you need to configure environment variables in your codebase.
-
Create or open your
.envfile in your project root. -
Add the credentials found in the Prerequisite step:
VITE_SUPABASE_URL=[your-project-url]
VITE_SUPABASE_ANON_KEY=[your-anon-key]
Option 2: Synchronize Database Schema (CLI)
Best for: Developers pushing local database changes to the production instance.
You can push your local database schema to Supabase using the connection string.
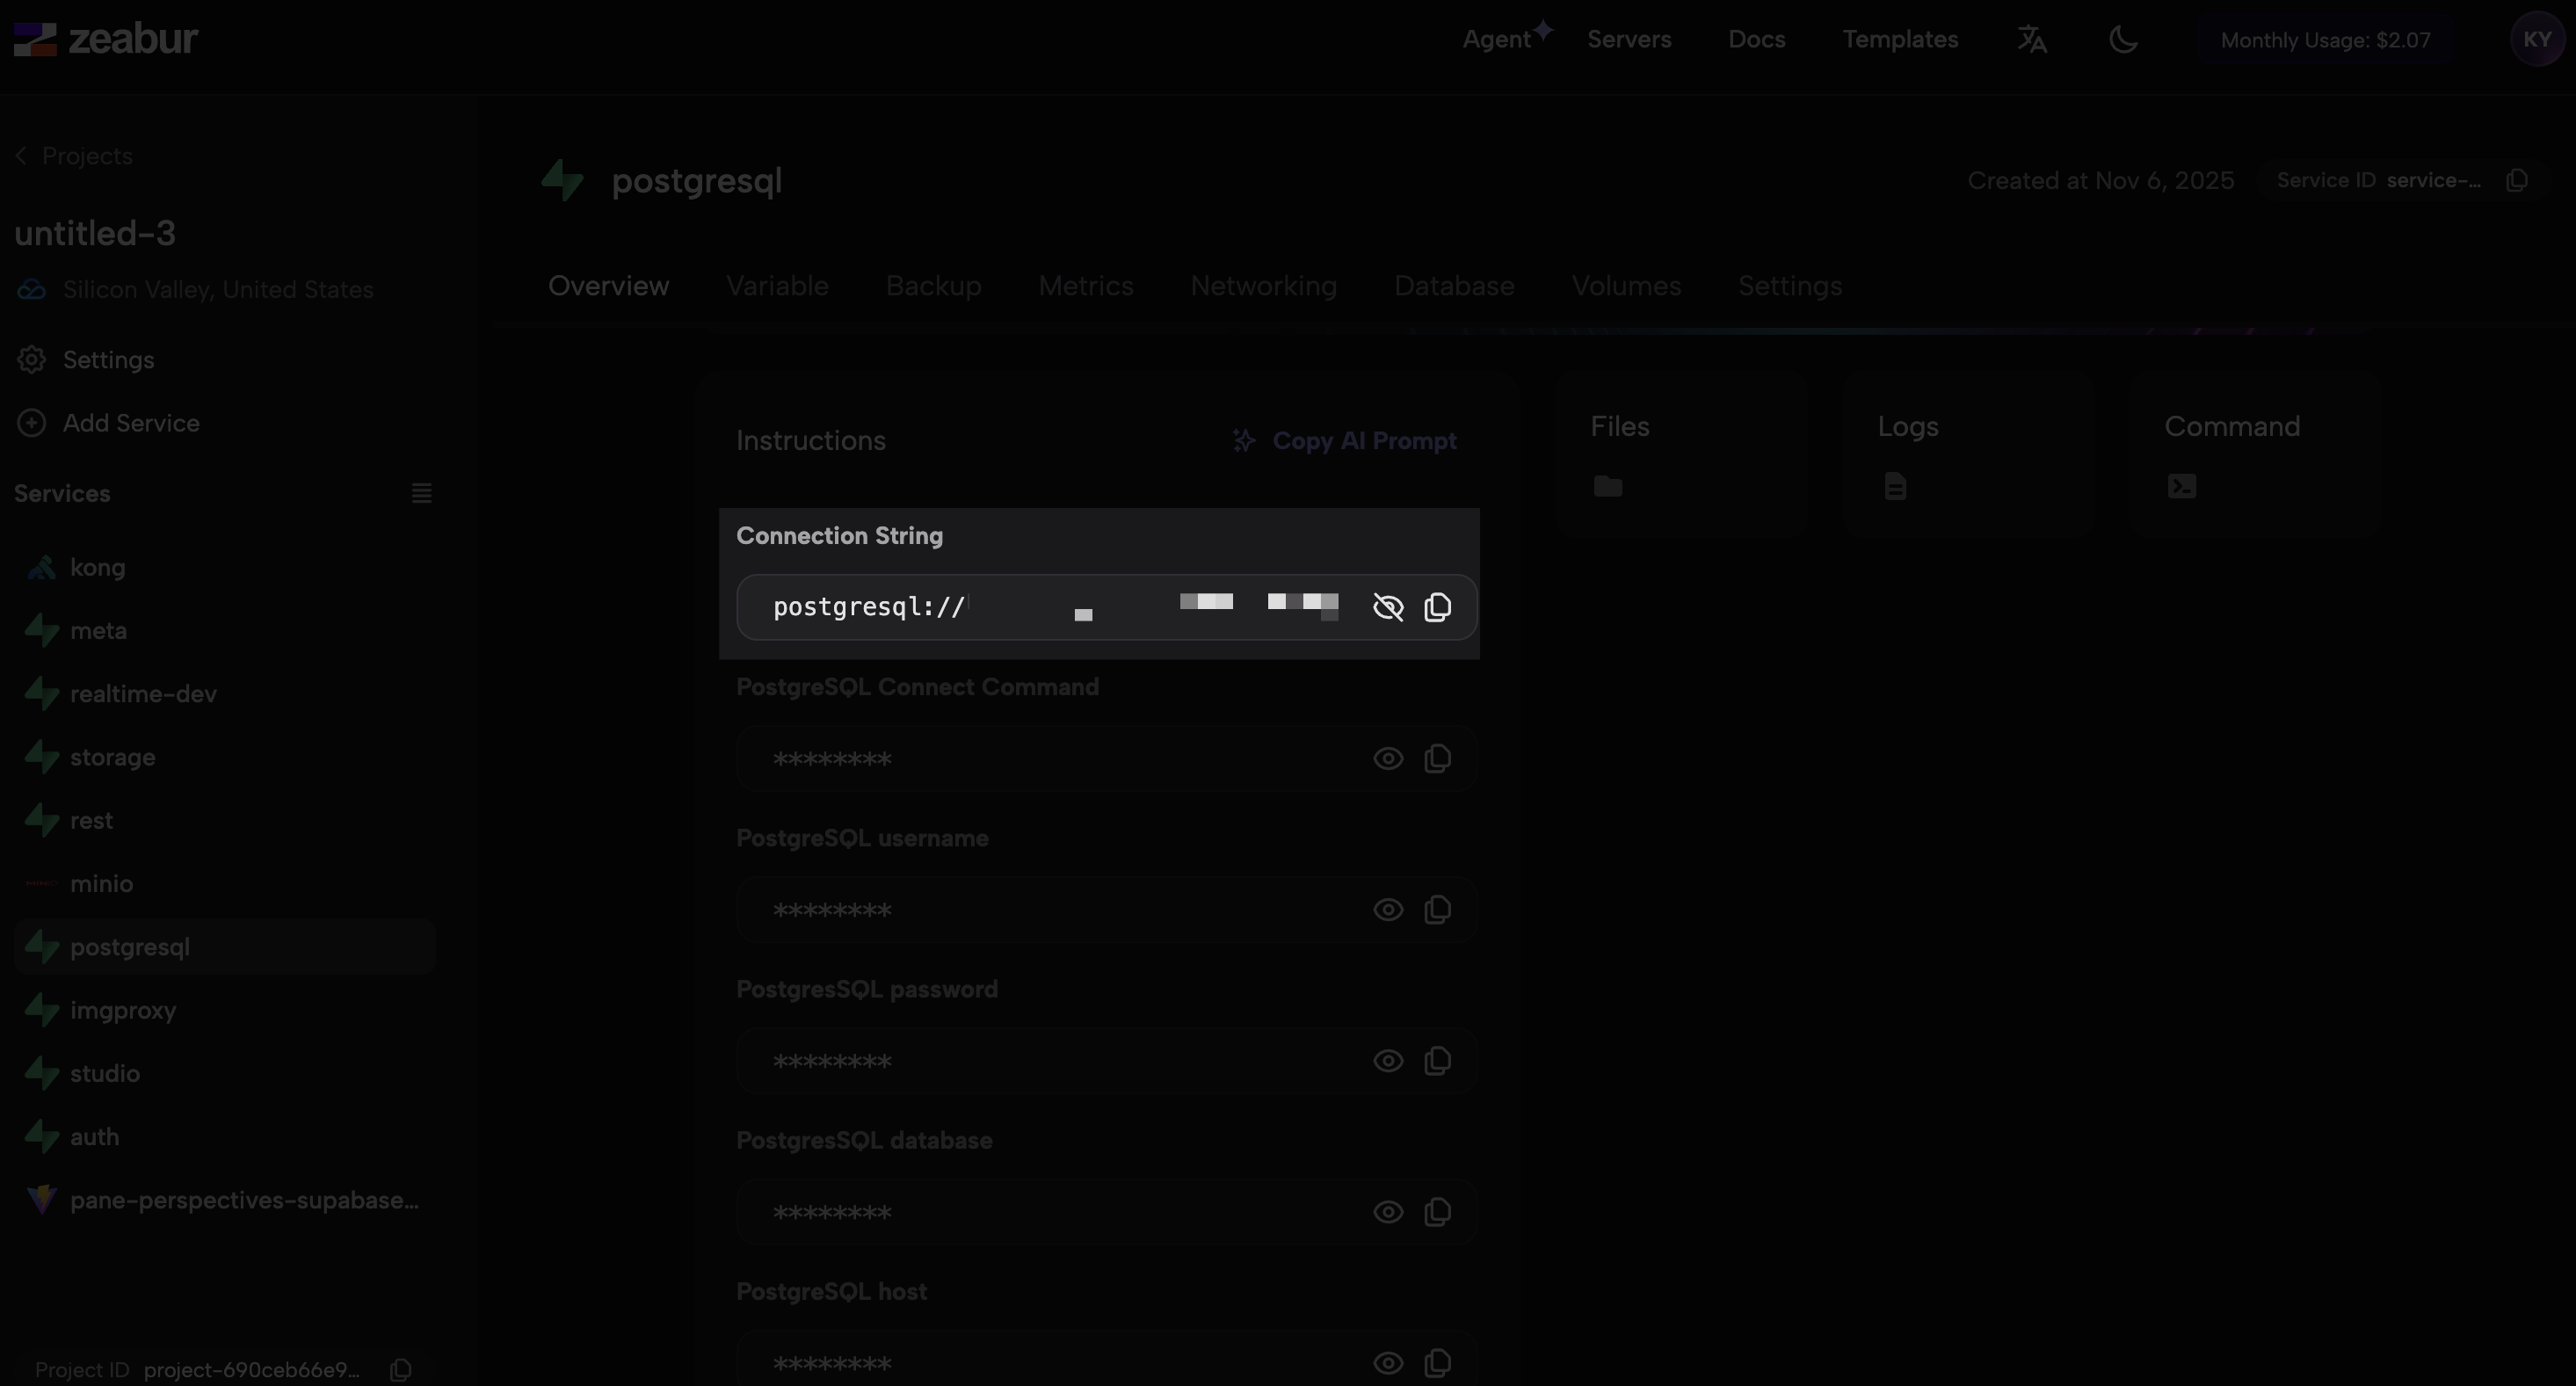
-
Get Connection String: Go to the PostgreSQL service panel (part of your Supabase stack) in your Zeabur dashboard.
-
Copy: Copy the PostgreSQL connection string.
-
Run Command: Execute the following command in your terminal (ensure you have the Supabase CLI installed):
supabase db push --db-url "[your-supabase-postgresql-connection-string]" --debug
Phase 4.5: Connecting Your App (Inter-Service)
When you deploy your application to Zeabur alongside Supabase, you must inject the credentials into the deployment environment.
The Manual Way
- Go to your App Service settings in Zeabur.
- Click the Configurable button (or go to the Variables tab).
- Add the following variables:
VITE_SUPABASE_URL: Paste your Project URL.VITE_SUPABASE_ANON_KEY: Paste youranonpublic key.
Hint: Please make sure the credentials file such as .env is listed in your .gitignore file to prevent leaking secrets.
Phase 5: Advanced Configuration (Optional)
Add these variables to the specific services to enable advanced features.
1. Advanced Auth Hooks (Auth Service)
Add these to the Auth service variables to trigger Postgres functions on specific events:
- Custom Access Token Hook:
GOTRUE_HOOK_CUSTOM_ACCESS_TOKEN_ENABLED=trueGOTRUE_HOOK_CUSTOM_ACCESS_TOKEN_URI=pg-functions://postgres/public/custom_access_token_hook
- MFA Verification Hook:
GOTRUE_HOOK_MFA_VERIFICATION_ATTEMPT_ENABLED=trueGOTRUE_HOOK_MFA_VERIFICATION_ATTEMPT_URI=pg-functions://postgres/public/mfa_verification_attempt
- Password Verification Hook:
GOTRUE_HOOK_PASSWORD_VERIFICATION_ATTEMPT_ENABLED=trueGOTRUE_HOOK_PASSWORD_VERIFICATION_ATTEMPT_URI=pg-functions://postgres/public/password_verification_attempt
2. Studio AI Assistant (Studio Service)
Enable the AI SQL assistant in the dashboard by adding this to the Studio service variables:
OPENAI_API_KEY=your-openai-api-key
3. Security Tweaks (Auth Service)
GOTRUE_EXTERNAL_SKIP_NONCE_CHECK=true(Useful for mobile Google Sign In)GOTRUE_MAILER_SECURE_EMAIL_CHANGE_ENABLED=true(Enforce email verification for email address changes)