
MongoDB
A source-available, cross-platform, document-oriented database program.

Services
mongodb
mongo:8Deploying MongoDB
MongoDB is a popular open-source, document-oriented NoSQL database. Instead of traditional rows and columns, it stores data in flexible, JSON-like documents, making it an excellent choice for modern web applications that require high performance and scalability.
Zeabur simplifies the process of setting up a database. Instead of managing Docker containers or configuring servers manually, you can deploy a fully functional MongoDB instance from the Marketplace with just one click.
What you will learn
In this tutorial, we will guide you through:
- Deploying a MongoDB service on Zeabur.
- Connecting to your database locally using VS Code, Compass, or Mongosh.
- Configuring your Node.js or Python application to talk to the database.
Phase 1: Deploy the database
Step 1: Create the MongoDB Service
Zeabur offers a "one-click deployment", meaning you rarely need to configure complex settings manually.
Option 1: Create Postgresql instance from Project page
- Log in to your Zeabur Dashboard.
- Click the "New Project" button.
- Select "Template" (Marketplace).
- Search for
MongoDB. - Select the official MongoDB image. Your service will start deploying immediately.
Option 2: Create MongoDB instance from template page
- Log in to your Zeabur Dashboard.
- Select
FeaturesandTemplate. - Choose or Search
MongoDB. - Select MongoDB (usually the official image) click
deployand it will start deploying.
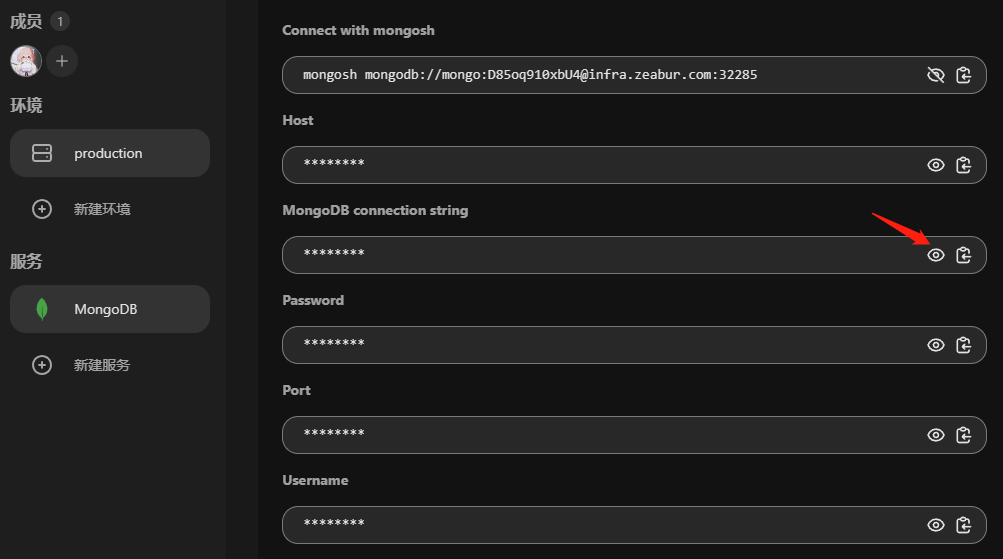
Step 2: Get Your Connection String
- Go to the Instruction tab of the service.
- Copy the MongoDB connection string (URI).
- It looks like this:
mongodb://mongo:xxxx@xxx.clusters.zeabur.com:25909
- It looks like this:
Phase 2: Connecting with database
Option A: Connect using VS Code
The best way to manage MongoDB in VS Code is using the official extension.
- Install the Extension:
- Go to the Extensions Marketplace.
- Search for "MongoDB for VS Code".
- Install the one created by MongoDB.
- Add Connection:
- Click the MongoDB Leaf Icon that appears in your sidebar.
- Click "Add Connection".
- Select "Connect with Connection String".
- Paste and Connect:
- Paste the URL you copied from Zeabur in Step 3.
- Press
Enter. - You can now browse your Collections and Documents directly in the sidebar.
Option B: Connect using MongoDB Compass (Official GUI)
If you want to visualize your data (tables, graphs, schema analysis), MongoDB Compass is the standard tool.
- Download and install MongoDB Compass.
- Open the application.
- In the "URI" box, paste the Connection String from Zeabur.
- Click "Connect".
- Troubleshooting: If it fails, ensure you didn't accidentally copy the "Internal" host. The internal host usually ends in
.svc.cluster.local, which won't work on your computer. The public host usually ends in.zeabur.app.
- Troubleshooting: If it fails, ensure you didn't accidentally copy the "Internal" host. The internal host usually ends in
Option C: Connect using Mongosh
mongosh is a fully-featured JavaScript and Node.js REPL environment for interacting with MongoDB databases.
Once you have downloaded and installed it according to the documentation, go back to your Zeabur dashboard. Click on the Connections tab in the MongoDB service, and click the eye icon to copy the connection string.
mongosh mongodb://<YOUR_CONNECT_PATH>
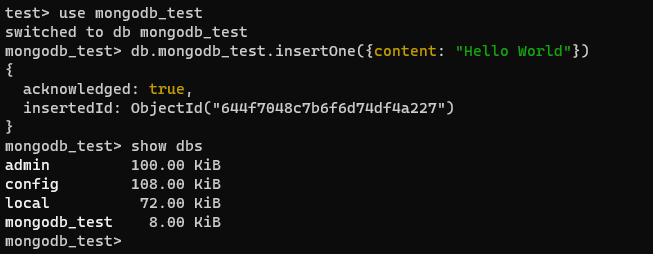
Replace <YOUR_CONNECT_PATH> with the connection string you just copied, and we can use the following command to test if the connection is successful:
use mongodb_test
db.mongodb_test.insertOne({content: "Hello World"})
show dbs
If successful, it should return:
Then we can drop the test database.
use mongodb_test
db.drop()
💡 Important Note: "Internal" vs "Public"
- For Local Development: Use the Public Domain you just set up.
- For Your Deployed App: When you deploy your backend code (Node.js/Python) to Zeabur, change your
MONGO_URIenvironment variable to use the Internal connection string (found in the "Private" section of the Connection tab).- Why? The internal connection is much faster and does not count towards your public bandwidth usage.
Services